Development:Setting up RootFS
Setting up a RootFS
For AArch64 hosts you are required to have an x86-64 rootfs. With or without 32bit compatibility libraries.
This isn't strictly required for testing on x86-64 host environments but is useful for ensuring correct behaviour there.
Quick Setup with FEXRootFSFetch
FEX comes with a FEXRootFSFetcher tool that can download an official preconfigured rootfs from the FEX servers. This tool operates as either a terminal application or a Zenity application depending on if it is launched from terminal or not.
This tool will walk you through selecting a RootFS for FEX:
- If your host OS matches one in the download list then it will recommend that one
- After selecting the RootFS, it will download it
- This downloads to the default location in $HOME/.fex-emu/RootFS/
- After downloading the RootFS the tool will ask if you want to use the SquashFS file directly or extract it
- It will then ask if you want to set the downloaded RootFS as your default
- This writes to the default configuration in $HOME/.fex-emu/Config.json
You can skip the rest of the guide if you used FEXRootFSFetcher to download the rootfs.
Troubleshooting
- The squashfs image will fail to extract if you don't have unsquashfs installed
- Install the squashfs-tools package to get this application
- SquashFS RootFS file corrupted?
- Rerun the tool, select the rootfs from the list, and if the rootfs already exists it will ask to verify
- If verification fails it will ask if you want to redownload
- Want to manually check the hash?
- Run the rootfs file directly through the tool to get a hash
- FEXRootFSFetcher $HOME/.fex-emu/RootFS/Ubuntu_21_10.sqsh
- Ubuntu_21_10.sqsh has hash: bf9507fbdbaec2cf
- Want to use the Zenity UI but still launch through terminal?
- Force Zenity from terminal with FEXRootFSFetcher 1> /dev/null
- What if my Linux distro isn't listed?
- Don't worry, select one that is most similar to yours or newest
- This will work in most cases
- How can I trust these images?
- These images are generated by scripts living in our public repo
- If you want to rebuild them yourself, you are free to do so.
- https://github.com/FEX-Emu/RootFS
- I want to add a distro
- Follow how our current rootfs is generated and add your own
- Open a pull request to add the rootfs setup
- Contact us on the official FEX-Emu Discord to get the RootFS added to the server.
- Where is the raw list of images at?
- The image links live on our website at the following link
- https://rootfs.fex-emu.org/file/fex-rootfs/RootFS_links.txt
- This file is in a format that our tool understands
- Generally the format is:
- Distro Name
- Distro Version
- Human readable name
- Raw rootfs link
- xxhash based file hash
Prereqs
An x86-64 PC OR qemu for chrooting
Getting Started
The easiest way to get started is to just download a prebuilt x86-64 rootfs from your favourite distribution and extract it to where you want.
- Ubuntu - http://cdimage.ubuntu.com/ubuntu-base/releases/
- Debian Debootstrap guide - https://wiki.debian.org/Debootstrap
- Debootstrap is more involved and not explained here.
Using chroot you can then enter the rootfs and install applications that you desire for testing purposes. It's easiest to set this up on an x86-64 host and then copy it to an AArch64 device.
Cross architecture chroot
You need to have binfmt_misc setup for x86-64 support on your host system.
- ls /proc/sys/fs/binfmt_misc
- If there are files in this folder then your host supports binfmt_misc
You then need to copy the qemu-x86_64-static over to the rootfs. This way your kernel can find the interpreter after chrooting.
- sudo apt-get install qemu-user-static
- cp /usr/bin/qemu-x86_64-static ${ROOTFS}/usr/bin/
- sudo chroot ${ROOTFS} qemu-x86_64-static /bin/bash
Careful. If you've installed FEX's binfmt_misc then chrooting can become broken. This is because FEX's binfmt_misc conflicts with qemu.
Additional TmpFS folders
Depending on what you're doing in the chroot, you may need or want some tmpfs folders that applications are expecting
- sudo mount -t proc /proc ${ROOTFS}/proc/
- sudo mount --rbind --make-rslave /sys ${ROOTFS}/sys/
- sudo mount --rbind --make-rslave /dev ${ROOTFS}/dev/
- sudo mount --rbind --make-rslave /dev/pts ${ROOTFS}/dev/pts/
Then of course, make sure to unmount these partitions when you're done
- sudo umount ${ROOTFS}/proc/
- sudo umount -R ${ROOTFS}/sys/
- sudo umount -R ${ROOTFS}/dev/pts/
- sudo umount -R ${ROOTFS}/dev/
Using the rootfs with FEX
If you're using FEXLoader then you can pass the full path of the rootfs with the -R option. Additionally you can put the rootfs folder inside of $HOME/.fex-emu/RootFS/<RootFS name>/ and FEX supports a "named" rootfs option
- eq: -R Ubuntu_2104 will use rootfs $HOME/.fex-emu/RootfS/Ubuntu_2104
- Read the Fex man page with man fex for more information
Setting RootFS with FEXConfig
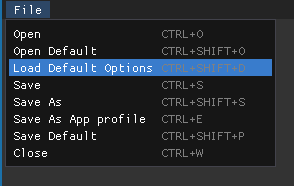
 On the first run of FEXConfig, select the "Load Default Options" configuration.
- Subsequent runs should select "Open Default"
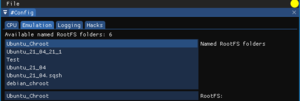
FEXConfig will autopopulate the rootfs list with rootfs folders that exist in $HOME/.fex-emu/RootFS/
You can select one from the list or provide a full path in the RootFS: line to set it manually.
Make sure to select the File->Save option after the fact to save
Additional Steps
Running under WSL1
/etc/hosts and /etc/resolv.conf change on the host side. You'll need to copy those over to the rootfs if you want network functionality to work.
Ubuntu packages to install
Sample packages to install in the rootfs
- apt-get install pulseaudio libgles1 libgles2 libglx-mesa0 libgl1-mesa-dri libgl1-mesa-glx mesa-utils mesa-utils-extra
Pulseaudio specifically is required so pulseaudio will work when talking to the host pulseaudio
File deletion
Some files need to be deleted from the rootfs otherwise some applications will fail to work.
Note that deleting these files WILL break the rootfs and you won't be able to chroot in to it anymore.
A likely better route would be a script that moves these files and folders then brings them back when you want to chroot
Files to remove
- ${ROOTFS}/etc/hosts
- ${ROOTFS}/etc/resolv.conf
- ${ROOTFS}/etc/timezone
- ${ROOTFS}/etc/localtime
- ${ROOTFS}/etc/passwd
Folders to remove
- ${ROOTFS}/boot
- ${ROOTFS}/dev
- ${ROOTFS}/home
- ${ROOTFS}/media
- ${ROOTFS}/mnt
- ${ROOTFS}/proc
- ${ROOTFS}/root
- ${ROOTFS}/srv
- ${ROOTFS}/tmp
- ${ROOTFS}/var/cache/apt
- ${ROOTFS}/var/lib/apt
- ${ROOTFS}/sys
- ${ROOTFS}/opt
Building a Squashfs rootfs
SquashFS is a great way to do binary distribution of the rootfs.
SquashFS is currently only recommended for binary distribution. User should unpack it to not get dangling processes and mounts.
- Offers tooling to mount in userspace
- Supports ZSTD compression
- Is a readonly partition that matches FEX's use case
Tools that FEX needs to run squashfs
- squashfuse
- fusermount
Making the squashfs image
Making the squashfs image is very straightforward
- mksquashfs ${ROOTFS}/ Squashfs.sqsh -comp zstd
This creates a file called Squashfs.sqsh that contains the original rootfs that we generated above.
Using the squashfs image in FEX
- Copy the resulting sqsh file in to ${XDG_DATA_HOME}/.fex-emu/RootFS/
- If ${XDG_DATA_HOME} doesn't exist then that will be replaced with ${HOME}
- Use FEXConfig to select the sqsh file as a named rootfs
- or pass the name in to the FEX_ROOTFS argument in the various ways FEX supports
- or the absolute path if you don't want it in the FEX RootFS folder
Extracting the squashfs
If you don't want to use squashfs for whatever reason then you can extract it in to the FEX RootFS folder and use the directory directly
- unsquashfs -f -d NewRootFS/ Squashfs.sqsh
If you want to install packages in the squashfs
The squashfs image is immutable and can't be modified.
- Extract the squashfs first
- Change the working directory to the rootfs
- execute `unbreak_chroot.sh`
- `apt-get update`
- `apt-get install <Whatever you want>`
- `exit` to leave the chroot
- `break_chroot.sh`
- Use the new extracted chroot directly, or follow the previous steps to recompress it to a squashfs format.
Known problems with squashfs
FEX automatically mounts your squashfs file and can leave dangling squashfs mounts around in some instances.
- This is fairly rare but it can occur. Whenever an instance of FEX is run, it registers with the FEXMountDaemon
- FEXMountDaemon then watches these instances of FEX to ensure they have exited before unmounting
- There is roughly a ten second grace period of no instances of FEX running before unmounting
- If an instance of FEX starts running then it will reuse the mount partition and reset the timeout
- To get rid of these dangling mounts if they do manage to manifest, use the following commands
- fusermount -u /tmp/.FEXMount* ; rmdir /tmp/.FEXMount*
- These don't require root to unmount
- In some cases the unmounting can end up returning busy status and not unmount
- Check the output of `mount` for any /tmp/.FEXMount folders
- This is due to either FEXMountDaemon or squashfuse still running in the background
- Can force the application to exit
- step 1: kill `pidof squashfuse`
- This will attempt to send SIGTERM to all squashfuse applications, which will unmount the partition on terminate
- Failing that, you can try to be more abusive
- kill -9 `pidof FEXMountDaemon`
- This will forcibly terminate FEXMountDaemon which should also take out the child mounted process
- If any instances of the mount still exists then you may need to kill more FEX processes.
- Any FEXInterpreter process will end up keeping the folder mounted and keep it busy
strace breaks squashfs
- If you run FEX with `strace -f` then the process that mounts your rootfs loses its setuid bit.
- This means you then can't mount the rootFS
- The only workaround is to not use a squashfs in this instance.
- Alternatively you can spin up a FEXBash instance to force squashfs to be mounted. Then strace a different FEX instance which will use the mounted squashfs location.
